Over the last few months I’ve been making steady improvements to the network and sever situation in the house I live in. Â I have two roommates, so finding time to implement changes is sometimes a challenge. Â They aren’t big fans of the internet going down while I upgrade things. Â And when I set up a server I want to present it only after I have it running and know they can expect it to be reliable.
A few months ago I upgraded the existing network. Â There were some specials on Newegg that allowed me to change up several components. Â The Linksys router was switched to the Buffalo WZR-HP-G300NH. Â I wanted something with the customization capabilities of DD-WRT, but a with little more memory and speed than the (still great) Netgear WNR2000. Â Unfortunately, the WZR-HP-G300NH has some problems, namely the current official firmware – which is a DD-WRT build – has a wireless dropout issue. Â While I linked to the DD-WRT site there, I don’t approve of the fixes on the Wiki. Â Monitoring for a dropped ping and restarting the wireless interface is not a fix, it’s a hack in the derogatory sense.
I was seeing daily drops of the Wifi connection, and ultimately had to add in the old Linksys back as an AP.  I’m still using the Buffalo for wireless N, and my N devices are laptops and phones that don’t need constant connections.  Fortunately the router is rock-solid for wired connections, so with a Gigabit Switch that was also on sale I was set with enough connections and speed to set up something cool.
For the servers I had two machines:  A 2.26Ghz Pentium 4 1GB, and a Core 2 Duo 3.0Ghz  8GB server that I picked up very cheap from a friend of mine.  The Pentium 4 was already working as a media server – it couldn’t do any transcoding though, so it was actually behaving more like a glorified file server.  It also has 400GB of hard drive space, so eventually it will become a dedicated NAS.  To that end I installed a gigabit NIC in it for faster transfers.
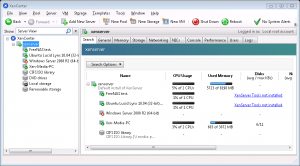
The Core 2 Duo server is where things get fun. Â It supports virtualization, so it is now a XenServer box with a few different VMs on it:

Here is the VM breakdown:
- FreeNAS – A NAS test install before I move to the actual hardware
- Ubuntu Server – SSH tunnel entry point, as well as webapp test server
- Windows Server 2008 – To be used later for a domain building project
- Xen-Media-PC – The new media server to replace the Pentium 4 box
The Ubuntu server and Media PC are the most noteworthy. Â The Media PC VM will be taking media streaming responsibilities as well as acting as my CrashPlan backup point. Â Originally I planned to have it act as an FTP server as well, but with the NAS in place I don’t see a real need to bring that functionality in. Â And with the jump in power for the Media streaming software, things like real-time transcoding and subtitle overlays are now a possibility. Â Which is doubly impressive to me considering this is a virtualized environment!
The Ubuntu server isn’t as immediately impressive (it doesn’t exactly “do” anything yet) but I’m very happy with it because I’ve finally learned how to set up OpenSSH with shared key authentication. Â It’s something I’ve used at work (after it was set up) but I’ve never done it for my own purposes. Â I was amazed at how easy it is to set up and how much you get with that setup. Â I was expecting a console session and that’s it. Â Instead I was able to begin using things like SSH tunneling, proxies, and SCP immediately!
The SSH tunneling was of particular interest to me, I use LogMeIn Hamachi to remote into my home machine nearly anywhere I go, but Hamachi has its limits. Â It doesn’t run on everything, and offers nearly no ability to remote through phones. Â SSH works nearly anywhere, I even got my phone working with remote access, and I expect my iPad and TouchPad to work with it too. Â And to be frank about it, I found RDP through SSH to be snappier than through Hamachi. That surprised me, I believe Hamachi is a direct connection after it negotiates with the LogMeIn servers; I expected there to be no real difference in speed switching to SSH. Â Now that I have it set up though, I can see why this is considered the standard for remote access. Â It’s secure, it’s open, and it’s fast.
What all of this means is that I now have a fully configured media server than my roommates and I can access and push files to without worry, as it has the power to transcode on the fly. Â And the ability to access it anywhere I can use SSH. Â But more importantly I’m familiar with XenServer and OpenSSH now, which I wasn’t before. Â It’s been exciting setting all of this up, and I can’t wait to get more uses out of this hardware!
