Tag Archives: QCCoLab

Adding Heatsinks to a Hauppauge WinTV-HVR-950Q

This weekend I finally bought a membership for the QC Co-Lab, and took the opportunity to work on the TV Tuner modification I talked about previously.

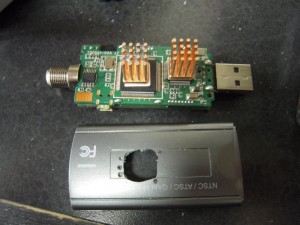
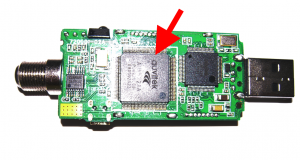
Again, it’s a Hauppauge WinTV-HVR-950Q that I got from Newegg, and while I was using it, I noticed the main chip was getting hot.  While I can’t claim it had any noticable impact on image quality or performance, I just wasn’t comfortable with the casing becoming too hot to touch.  So I removed the casing and started watching TV to see which chip heated up.  That chip is pointed out here:

TV Tuner - Case Removed

TV Tuner - Case Removed

Looking up the chip, it’s an Auvitek AU8522AA, the ATSC / NTSC decoder for the incoming signal. It makes sense that it would get so hot.  So the next step is to order the heatsinks, I chose these from Newegg. Once I had those, I tested them on the bare TV Tuner, and found I actually needed two:

Heatsinks on TV Bare Tuner

While the larger chip was generating the majority of the heat, the smaller one heated up pretty well too.  Also, ideally I would’ve bought two sets of heatsinks, a larger set for the main chip, and then used the ones I have for the smaller chip.  But at $15 for these heatsinks, I wasn’t willing to spend more.

Next up was marking the casing for the holes.  Originally I had planned on using a stamp ink pad to mark the pins, and press that against the casing to determine where the holes should go.  I forgot to buy one, so I had to improvise on site with some thermal grease.

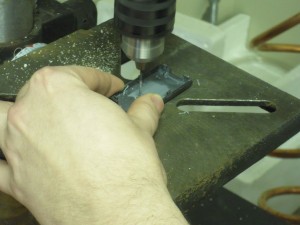
While I was discussing this with my friend Ben, he enthusiastically volunteered to start the drilling, so I took the chance for another picture:

Case being drilled.

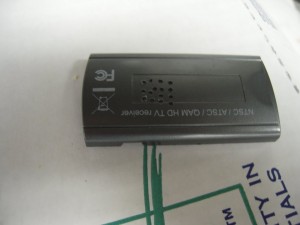
Unfortunately that drill has a bit of vibration on it.  So the holes didn’t line up with the precision we were hoping for:

Holes in casing

Not a problem, I just cleared out a larger hole to fit the entire heatsink through.

Larger hole in casing.

On the second set of holes, I marked through the thermal grease with some marker to help line things up.  The drill still had a lot of give though, so it wasn’t going to line up properly.  I had to re-drill the same holes several times before the entire heatsink would fit through.

Both heatsinks through their openings - Note the per-rod holes for the second heatsink.Closeup of Heatsink with individual rod openings.

I’m so happy that I got this shot, when I was mentally picturing this project, this is what I wanted.  Individual openings for each heatsink rod, with space inbetween to keep it inside and pressed onto the chip.

Unfortunately, the bases on the heatsink were taller than I expected, and I couldn’t fit the entire casing back on with the openings done this way.  So the second heatsink has a full opening like the first one.  Here is the final result, after I swapped the marked heat sinks for fresh ones:

Finished mod, with both heat sinks.

While this definitely looks home made, I think it still looks clean and presentable.

As for the results of the mod:  Over time, the entire casing can still get pretty hot, the heatsinks themselves get too hot to touch after about an hour of watching or so.  Performance is effectively unchanged, since it was working correctly before this modification, but I’m much more comfortable with it knowing the heatsinks are pulling away a lot of that heat.

And also, if you want to see some other QC Co-Lab pictures, they are available in this Picasa album: http://goo.gl/USaNb

Thanks for reading!
Projects for the Co-Lab

Although I haven’t signed up for a membership yet, I’ve spent quite a bit of time at the Quad Cities Co Lab (https://www.qccolab.com/) and I’m really starting to get the itch to start a project.  Tonight I’ll be attending a Microcontroller programming class there, and I have two more ideas I wanted to document.  One of them is going to happen, the other may take a bit longer, and may not entirely be my project.

First, the simple one.  I have a Hauppauge WinTV-HVR-950Q that gets very hot during use.  I opened it up, and found the chip responsible for all the heat:

TV Tuner - Case Removed

TV Tuner - Case Removed

There isn’t anything too lofty here.  I found some heatsinks on Newegg, and they even come with thermal tape to attach to the chip.  What I’m really hoping to do is drill holes in the outer casing that the fins / poles on the heatsink will fit through.  If I do it right it should look really nice.

The next project has two parts.  The first would be to build a laser.  There are kits available to make 150mw blue / violet lasers.  Here is a video showing how they perform.  This is not the kit I would be building.  The kit is a lot more bare-bones.


So it’ll be a nice, bright laser and will probably work great for the parlor tricks shown in the video.

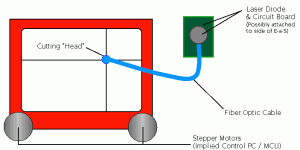
Now, I was inspired when I saw this Instructables article on making a wood-etching laser pen. I thought transmitting a laser through fiber optic would be too “lossy” to still etch or cut.  But if it can be done through fiber, the process of building a low-power laser cutter becomes a lot more practical.  I need a plotter / CNC platform to control it though.  And, well… I had this crazy idea, considering the fiber optics are so light…

Etch-A-Sketch Laser Cutter

Yes, I actually propose using an Etch-A-Sketch as the plotter.  There are plans available to build a computerized Etch-A-Sketch, I just want to change out the etching head with a laser.

Realistically, we probably won’t use an Etch-A-Sketch.  I bought one and (with a friend’s help) took it apart, the insides are a little tight to fit components in.  And also, those things are filled with aluminum powder.  But the main stopping point is that I’m worried about the parts slipping, making the cutter unreliable.  They’re toys, not exactly designed for precision.

My friend Mark has taken some interest in this project.  He wants to see a laser cutter built, and is already familiar with programming the Arduino microcontrollers we’d be using.  Hopefully we’ll be able to work together and build this thing.  I already have some printers I’m going to give him, we’re hoping there are usable stepper motors inside.

Several other people at the Lab have mentioned building a laser cutter, honestly I’d just like to see this thing built. If I’m not involved it’s unfortunate, but I’ll be just as happy to see someone else complete one of these things.

My last project is to learn how to program the Arduino, which will start with tonight’s class.  I don’t have any ideas for it yet, but I also don’t really understand what the Arduino can do.  I’m thinking once I have a grasp of that, I’ll get some ideas.