Facebook’s Response to Allegations of Trend Manipulation

On Monday Gizmodo reported from an anonymous source that Facebook has been manipulating trending topics, suppressing conservative views while promoting liberal views and groups.  Gizmodo has updated their article with a post from Tom Stocky, who runs the Trending Topics team at Facebook.

It’s a hard story to get bearings on, as the original story is from an anonymous source with no evidence presented.  Tom Stocky’s post, expectedly, claims that there is no manipulation of this kind happening.  You could choose not to trust Gizmodo’s source, or choose to dismiss Facebook’s claim as protecting their brand.  Both actions are justifiable.

In this case, I’d side with Facebook.  In Stocky’s post he states that all actions on trending topics are logged and reviewed.  This is easily falsifiable, to the point where claiming it would be a larger liability than saying there is no review process.  It’s also comforting to see him state explicitly that topics are not artificially inserted as trending.  The moderators can combine topics and dismiss hoaxes, but cannot create a topic from thin air.

Also interesting is a comment from Eric Davis, claiming that Google’s Safe Browsing algorithms came under similar accusations in their early days.  In that case, more transparency made it clear what criteria the pages were being ranked by.  I feel the same idea could be applied to trending topics to clear up doubts about how such topics are chosen.  What I would like to know is the details of their review process, and some insight into how trending topics are managed.

Whether Facebook is manipulating trending topics or not, I think the concept itself is intriguing.  In the information age control over context and narrative has more power than ever before.  I had written off “trending” stories just to mean “stories chosen by algorithm”, but now I know to use a slightly more critical eye.


*Archive used in case of page changes


Protecting the Open Internet

Recently I was asked by my employer, Ensighten, to draft a blog post about net neutrality.  They were able to use the draft to guide their post on the issue.  With their permission, I’m posting the original here as well:

On July 14th Ensighten submitted a public comment on FCC Proceeding 14-28, “Protecting and Promoting the Open Internet” in favor of net neutrality. The FCC’s current proposal for net neutrality allows for the opening of “fast lanes”. Content providers would purchase priority access to the network and would be able to deliver content faster than other services that haven’t purchased priority access. In effect, all other bandwidth is in the “slow” lane. This approach raises questions about the enforcement of fast and slow lanes, and stifles innovation by allowing existing properties to buy their way into faster access.

In the FCC’s model, each home Internet service provider would have the option of providing fast-lane service, but in order to provide a consistent experience to all users, a content provider would need to pay a fee to each of these ISPs. In addition to the initial outlay, this adds ongoing overhead due to maintaining contracts with each provider for access. Some services may be able to subsist on the slower lanes, but even a second of extra load time can reduce customer conversions, meaning many businesses will be forced to purchase this priority service.

Under a true net neutrality model, all information would be treated equally on the wire. The ability to serve content wouldn’t be affected by others competing for the same users. In this model the Internet behaves more like a phone service, where calls aren’t prioritized, but rather handled as they come in. The ability to serve content is still limited to the speed of the service purchased, but cannot be delayed in-transit to the user.

For Ensighten, the net neutrality model allows us to deliver analytics tags to our customer’s pages quickly and consistently.  Knowing that our data can’t be slowed in transit allows us to state with confidence that we can provide the fastest Tag Delivery Network for our users.  In turn, our customers will benefit by knowing our tag delivery will always be as fast as possible, leading to consistent load times and page performance.

The other benefits of net neutrality apply equally to Ensighten, and our customers. Both will save money and manpower from creating agreements with any number of ISPs. Our customers and their end users will see consistent quality of access to the services they use.  Based on Ensighten’s comment and the comments of the million-plus businesses and users who rely on an open internet, we hope the FCC will see this issue the same way.

Previous Work: CSR Interface and Dashboard for MetroLINK (2012)

Static demo (w/ dummy data)

Source code (zip)

Before I begin I want to say that the code here, along with any other code I have posted, is posted with the expressed permission of the company that originally had me write it.

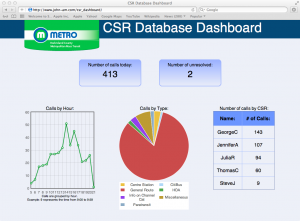
This is something I’ve been anxious to write about, I’m really happy with the results and it helped out quite a bit at MetroLINK.  It’s a web dashboard to show the call data from Metro’s Customer Service Representatives (CSRs).  It pulls data from an Access database through ODBC, and uses PHP to generate the main dashboard as well as the drill-down pages.  The graphs are provided by the excellent Flot javascript library.

Last year it was decided that more information had to be gathered in regards to how many calls the CSRs were taking, and what those calls were about.  Our phone system didn’t support anything beyond basic logging, so until the system could be upgraded something needed to be put in place that would allow the CSRs to track their own calls.  I opted for Access because it was a database system others were already familiar with, and I could make an interface easily enough by using VBA and Access’ own forms.  We saw results almost immediately, and had a much better insight into what the CSRs were doing.

Just using the Access built-in reporting functionality was great, but it was missing the “live” element.  That’s when I decided to start working on this in my spare time.  I discussed what we would need on a dashboard with my co-workers, and then set out to make it happen.

I had some hesitation when I was figuring out how to get the data from the Access file to PHP.  The same file was being used by the CSRs to input this same data, so I had been worried about the file being locked.  The Access forms were already split to avoid this, but I didn’t know how a connection from PHP  would behave.  With ODBC setting up the connection to the Access file was a breeze, and I was pleased to find out it handled multiple connections without issue.  On top of that I could specify that the connection was read-only, providing some security as well.

When I was designing the dashboard I wanted it to have a similar appearance to the public-facing website gogreenmetro.com, so I borrowed the color scheme and title image.  While the data was only changing on each refresh (more on that later) I wanted the dashboard to appear to have activity in it.  To get to this goal I included several hover-over effects and made things respond in useful ways where I could.  Primarily in the graphs and tables where you can highlight parts and get specific information about a point or pie piece.  While it isn’t perfect, it gives the dashboard a little more polish and makes it feel more “alive” than the same page without those elements.

After the main dashboard was completed I started working on the drill-down pages.  They can both be accessed by clicking the numbers for total number of calls and number of unresolved on the main page.  The unresolved drill-down is just a larger version of the breakdown by CSR, which is just building a table.  But the number of calls drill-down introduced some challenges.

On the main page I used the hour function to group calls by hour, and sent that to Flot.  It was simple, and worked for the purposes of the graph.  Moving on to the more advanced graphs though, that method was no longer going to work.  I had to use Flot’s time support, which means I needed to get milliseconds from the Unix Epoch, as that’s JavaScript’s native time format.  None of this was too challenging until timezones entered the picture.  Using Datediff to give me seconds from epoch gave me a sort of “false UTC” that treats the times as if there was no time zone offset.  Since the data would always be correct in the actual database and the presentation wasn’t affected, I saw no problems with this.  It actually encourages it in the Flot API instructions.

Until I checked the tooltips.  JavaScript corrects for time zone when you start using date functions, so all my times were coming in a few hours off.  PHP provides a great way to get the local time zone offset in seconds, so I used that to correct the difference by changing it before the page was rendered.  A side effect of this is that the times change depending on where the page is viewed, so 3pm Central would be 1pm Pacific and so on.  In this context it would probably be a bug, but in other contexts it would be a feature.

In all, this project taught me a lot.  It reinforced my knowledge of things like JSON, HTML/CSS, and how to implement designs to work cross-browser.  It gave me a chance to use PHP for a project, and I learned about it in the process.  Finally, it also gave me a chance to really use Flot and jQuery.  Being able to bring all these things together in one consistent project was a great experience.

Previous Work: Halo Stats (2010-2011)


Download the Halo Stats for TouchPad source code

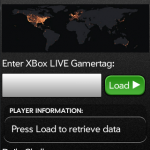
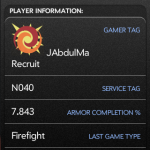
When Halo Reach was released a few years ago, I stumbled upon their statistics API and saw an opportunity for a new webOS application.  I had seen some success with my Quick Subnets app and wanted to develop more, but a creative writer’s block had set in and I couldn’t find something I wanted to build.  When I saw the API that was available, inspiration finally hit!  I created an application that allowed the user to look up any Halo Reach player and see their information.

Now, I’ll be the first person to downplay the abilities of Halo Stats.  It basically only loads player and challenge data, when other applications load all kinds of per-match statistics and information, and even display it in a better format.  But at the time, deciding to write it was a lofty goal.  I had never written an application that connects to the internet before other than some class projects in college, and I didn’t really know about AJAX and JSON beyond just the concepts of them.  Writing this was an opportunity to learn both of those concepts, and through that further expand my Javascript knowledge.

One thing I remember in particular is finding out how easy it is to access JSON compared to XML or other formats.  To do this day I opt for JSON when I can because of that.  I also remember that the frameworks used on the webOS hardware would block XMLHttpRequest calls, and wanted their abstracted versions to be used instead.  That was an adventure in troubleshooting almost worth its own post!

After I had written Halo Stats for the Palm Pre, I was actually contacted by a programmer representative at Palm who wanted to get me set up to write more apps, and even encouraged me to get a TouchPad version of the application together before it launched.  The TouchPad was using a new framework called Enyo, while the Pre had used Prototype.  So at the time I was writing code for a framework with no documentation outside the HP/Palm forums, for hardware that hadn’t been released to the public yet.  All my testing was done via web browser or emulator.  It was quite the challenge, and experience!

There are things I would definitely do different if I were to write this again though.  For me the biggest problem is in the code itself, I had some problems associating the style information to the elements that Enyo was generating; so I chose instead to set the innerHTML property of the elements to some HTML I was generating, and then I would control the styling via CSS.  This was beneficial in many ways,  I could centralize my styling, it allowed me to use techniques I was already familiar with and made the development process faster.  But it was detrimental in that I had no control of the display or positioning that was happening higher up in the software, and couldn’t predict some of the output because of that.  And the resulting code now has chunks of hard coded HTML in it, which is ultimately harder to work with in the long term.  When I made MD5 Lookup I worked around that, but I had far lower styling expectations for that program.

Staying on the styling issues – looking back I really wish I had put more time into it.  I will always claim to be a web developer before a designer, but I’m not completely blind to a bad layout.  The commendations are off-center and not vertically aligned with each other, there is a blue border around the right frame for no real reason, the challenges don’t like up with the map and other elements – and I could go on.  Ultimately the design was rushed and it makes the entire application worse.  In the future that is something I be sure to avoid, by putting in the time to properly test the styling and nitpick over the small details until it looks more refined.  Again, I’m not a designer – but that doesn’t excuse a poor layout and appearance. In retrospect I’d rather have a simple design that looks great than what happened here.

At this point the TouchPad, Pre, and webOS are outmoded, and even Bungie’s stat servers only give back historical data.  No new games are being registered on their servers.; everything has been replaced with 343’s Halo Waypoint.  But, if you have some webOS hardware or an emulator image Halo Stats is still available in the app store, and you can even look up a player’s info, as long as they played before the switch over to 343. I’ve posted the source code above as well – most of my writing is in the source folder, under SplitView.js and Splitview.css.

Thanks for reading!

Previous Work: Transfer Chart at MetroLINK (2009)

This is my first post in a series detailing some of my previous work.  It serves to remind me of how I accomplished tasks before, formats and techniques I used, and gives me a means to show my work to others if needed.

When I started at Metrolink I was tasked with finding ways to improve their Computer Aided Dispatch / Automatic Vehicle Location (CAD/AVL) system and implement the data it was using.  Part of that process was filling in for dispatchers and learning the routes and stops used by the buses.

The most difficult part of this was sending passenger requested transfers.  They had to be sent from the requesting buses to the receiving buses manually, through the dispatcher.  For a seasoned dispatcher this wasn’t a problem, but in my case I never had enough time on dispatch to really cement in my mind which buses would be at each transfer location.  Eventually I found a way to make a cheat sheet:  I would use SQL to query the scheduling database, giving me an always up-to-date schedule from the current time to about an hour after that.  I would use JSP and Spring to get that information onto a web page and formatted in a way that makes determining where the transfers are going easier.  Then I could access this sheet from any browser to figure out the transfers more quickly, and give it to new dispatches to aid them as well.

Here is what it looks like, or click here for an offline demo:Metrolink's Transfer Chart
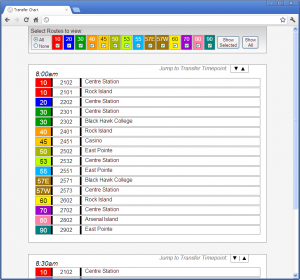
I don’t want to write pages of material about how Metro’s route system works, but suffice it to say that the Route (the colored section) is a path the bus takes, the block number next to it designates different buses on the same route, and the location shown on the right tells you where the bus will be at the time shown on top of the box.  Up top you can filter out just the routes you want to see.

A really basic example of how this would be used is this:  Assume it’s about 7:50am, and I have the screen shown above. I receive a transfer from block number 2102 requesting the Route 30.  Looking over the 8:00am entry, I can see that the 2102 is a route 10 bus that will be at Centre Station at that time.  So now I need to look at the route 30s – there is one that will be at Black Hawk College at 8:00, and another that will be at Centre Station.  The Centre Station bus is the one I want, so I’ll send the message to the bus with the block number 2302.  The whole process takes just a few seconds, which is important because there are a large number of transfers that come in.

When I was designing this I had several objectives in mind, along with making sure the chart functioned correctly.  First I wanted to keep content and presentation as separate as possible.  It makes for cleaner code – especially since this is written in JSP for actual use – and I love the idea of swapping out the CSS and some images for a complete appearance overhaul.  The only portion of this page where I break that ideal is the table up top – the background colors are set on the page.  That said, there isn’t much of a reason to change that table, and doing this via CSS is easy enough by setting an ID for each cell.

I wanted the design to be consistent cross-browser as well.  Unfortunately when dealing with IE6 there is only so much one can hope for, but generally speaking this looks the same no matter how you load it.  And it doesn’t lose functionality in any browser.  That said, since I wrote the code some display inconsistencies have popped up in the newest version of Firefox.  Specifically in how the table is handled in the top menu bar.

This project had its share of problems too, I hadn’t worked with visibility and display CSS settings before, so learning how they worked took some time and made for some unusual results.  This was exacerbated a bit when I added the ability to jump between “time points” where the buses are at one of the transfer locations.  I had to put an anchor link in an invisible div that remained active in the DOM, while not disturbing the rest of the layout, and also jumped to exactly the right position when click.  It took some time tweaking to get all of that working, but I love the results.  When you jump to an item it lines up with the top nearly perfectly.

Also, if I had to do it over I wouldn’t use Spring for this chart.  I had done some internship work at Pearson where I used Spring and JSP to display database information, and having heard about how much easier Spring makes database access I figured it would be foolish not to include it.  But this project only needed one query to be sent on load time, and all the excess that Spring brought to the table wasn’t worth it.  If I had more queries to run it would be a whole different story, but for something this simple I think Spring was excessive.

Overall, I’ve been very happy with how this project turned out and how useful it’s been.  The first day I used it I was nearly able to keep pace with the other dispatchers, and the drivers noticed that I wasn’t taking as long to get them their information.  It was even used for dispatchers in training up until about a month or two ago, when the CAD/AVL system automated the sending of transfers.  Not bad eh?
I’m now known as KD0RNX

I’ve been studying the last month or so to get my Ham Radio license, and the info was just posted today!  My call sign is KD0RNX.

Here is the info:

http://wireless2.fcc.gov/UlsApp/UlsSearch/license.jsp?licKey=3367478

I’m actually already looking into the RTLSDR stuff, so once I have that set up I’ll post more about it.  Until then!

Changing ownership on a Linux CIFS share

This is one of those very simple things that just doesn’t seem to come up right away in Google search results.  Especially if you’re new to how Linux handles ownership and file permissions.

Working on the server I mentioned in my last post, I couldn’t get some of the applications I am using to properly access my NAS mount point.  Specifically, any time permissions were trying to be changed it would fail because the program was running as my user, and not root.  Normally I’d just run the scripts as root, but I felt it’d be more secure to instead change those mounts to my user account.  Especially since these would be running unattended.  Also, I wanted fstab to bring up the drives already associated with my account.

First and foremost: Using chown on a mounted share will not work.  The command will behave as though it succeeded, but the ownership will not change.  Ownership can only be assigned at mount time.  Be ready to umount the share you wish to change ownership on.

The trick is to add the gid and uid to the fstab line for the mount.  So this:

//192.168.1.100/share      /media/nasshare          cifs    guest,rw,nounix,iocharset=utf8,file_mode=0770,dir_mode=0770 0 0

Becomes this:

//192.168.1.100/share      /media/nasshare          cifs    guest,rw,nounix,iocharset=utf8,gid=1000,uid=1000,file_mode=0770,dir_mode=0770 0 0

The above examples give full access to a share with no credentials, so it’s only shown as an example. But the gid and uid parameters specify the user and group that the share will mount as.

The source I’ve been using to learn all of these mounting procedures is here:
http://ubuntuforums.org/showthread.php?t=288534

Any more information needed about mounting shares in Ubuntu can be found there.

A real home network and server

Over the last few months I’ve been making steady improvements to the network and sever situation in the house I live in.  I have two roommates, so finding time to implement changes is sometimes a challenge.  They aren’t big fans of the internet going down while I upgrade things.  And when I set up a server I want to present it only after I have it running and know they can expect it to be reliable.

A few months ago I upgraded the existing network.  There were some specials on Newegg that allowed me to change up several components.  The Linksys router was switched to the Buffalo WZR-HP-G300NH.  I wanted something with the customization capabilities of DD-WRT, but a with little more memory and speed than the (still great) Netgear WNR2000.  Unfortunately, the WZR-HP-G300NH has some problems, namely the current official firmware – which is a DD-WRT build – has a wireless dropout issue.  While I linked to the DD-WRT site there, I don’t approve of the fixes on the Wiki.  Monitoring for a dropped ping and restarting the wireless interface is not a fix, it’s a hack in the derogatory sense.

I was seeing daily drops of the Wifi connection, and ultimately had to add in the old Linksys back as an AP.  I’m still using the Buffalo for wireless N, and my N devices are laptops and phones that don’t need constant connections.  Fortunately the router is rock-solid for wired connections, so with a Gigabit Switch that was also on sale I was set with enough connections and speed to set up something cool.

For the servers I had two machines:  A 2.26Ghz Pentium 4 1GB, and a Core 2 Duo 3.0Ghz  8GB server that I picked up very cheap from a friend of mine.  The Pentium 4 was already working as a media server – it couldn’t do any transcoding though, so it was actually behaving more like a glorified file server.  It also has 400GB of hard drive space, so eventually it will become a dedicated NAS.  To that end I installed a gigabit NIC in it for faster transfers.

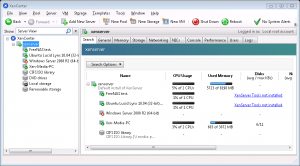
The Core 2 Duo server is where things get fun.  It supports virtualization, so it is now a XenServer box with a few different VMs on it:

XenCenter showing off my virtual machines!

Here is the VM breakdown:

  • FreeNAS – A NAS test install before I move to the actual hardware
  • Ubuntu Server – SSH tunnel entry point, as well as webapp test server
  • Windows Server 2008 – To be used later for a domain building project
  • Xen-Media-PC – The new media server to replace the Pentium 4 box

The Ubuntu server and Media PC are the most noteworthy.  The Media PC VM will be taking media streaming responsibilities as well as acting as my CrashPlan backup point.  Originally I planned to have it act as an FTP server as well, but with the NAS in place I don’t see a real need to bring that functionality in.  And with the jump in power for the Media streaming software, things like real-time transcoding and subtitle overlays are now a possibility.  Which is doubly impressive to me considering this is a virtualized environment!

The Ubuntu server isn’t as immediately impressive (it doesn’t exactly “do” anything yet) but I’m very happy with it because I’ve finally learned how to set up OpenSSH with shared key authentication.  It’s something I’ve used at work (after it was set up) but I’ve never done it for my own purposes.  I was amazed at how easy it is to set up and how much you get with that setup.  I was expecting a console session and that’s it.  Instead I was able to begin using things like SSH tunneling, proxies, and SCP immediately!

The SSH tunneling was of particular interest to me, I use LogMeIn Hamachi to remote into my home machine nearly anywhere I go, but Hamachi has its limits.  It doesn’t run on everything, and offers nearly no ability to remote through phones.  SSH works nearly anywhere, I even got my phone working with remote access, and I expect my iPad and TouchPad to work with it too.  And to be frank about it, I found RDP through SSH to be snappier than through Hamachi. That surprised me, I believe Hamachi is a direct connection after it negotiates with the LogMeIn servers; I expected there to be no real difference in speed switching to SSH.  Now that I have it set up though, I can see why this is considered the standard for remote access.  It’s secure, it’s open, and it’s fast.

What all of this means is that I now have a fully configured media server than my roommates and I can access and push files to without worry, as it has the power to transcode on the fly.  And the ability to access it anywhere I can use SSH.  But more importantly I’m familiar with XenServer and OpenSSH now, which I wasn’t before.  It’s been exciting setting all of this up, and I can’t wait to get more uses out of this hardware!

Blackberry 9900 missing “Mailbox” option in OWA setup.

I’ve been setting up some new Blackberry phones at work, and I’ve run into an issue on the 9900 models.  Sometimes they are missing the “mailbox” option in OWA setup.  From what I’ve seen, the only way to set this up is via the carrier specific Blackberry website*.  You’ll need to use your BlackBerry ID to get in.

If your Blackberry ID doesn’t work, try calling Verizon / your carrier.  In one case here we had to remove the ID and re-create it before it would allow access to those settings via browser.  Good luck!

*Here is Verizons: https://vzw.blackberry.com/html?brand=vzw


MD5 Lookup submitted to Palm!

I just submitted my newest TouchPad application to Palm, this is an MD5 Lookup tool powered by Noisette.  You can look for it under the (very literal) title “MD5 Lookup.”